webdev-resources
React Notes
| Tecnate | Last Updated: 2024.05.01 |
Table Of Contents
- React Notes
- Table Of Contents
- About This Document
- Quick Concepts
- Installing React
- React Development Quickstart Guide
- Uninstalling React
- UI Layout
- Naming React Components
- Organizing Your Project
- Lifecycle Methods
- Components \& Props
- Starting A Greenfield Project
- React Hooks
- Using Databases and HTTP
About This Document
This document is a brain dump for things that I’ve picked up about the React library. Use at your own risk!
Quick Concepts
React is a JavaScript library used to build user interfaces by implementing modular code that can be reused throughout your application.
Here are the fundamental concepts you’ll need to build/maintain React apps:
Components
ReactDOM
Class vs Functional Components
- ❌ Don't use class components (deprecated).
- ✅ Use functional components.
    - State management is decoupled with function components (cleaner setup/inheritance).
    - Libraries use hooks; classes won't be compatible.
JSX - extended JavaScript
Text, numbers, arrays render as text.
<p>[123] vs {[456]}</p>
// [123] vs 456
Objects return an error if rendered.
<p></p>
// Error
Booleans don’t render.
<p>{true === true}</p>
// (renders nothing)
Variable render their values.
const name = "Clark";
<p>{name}</p>; // Clark.
Syntax Note:
{}vs{ {} }: The outer pair of{}indicates a JSX expression, while an inner pair{ {} }contains an object within the expression.
State
Event Handling
Asynch setState
Props
- props: properties passed down from Parent Component to Child Components.
Refs
Controlled Components
Inputs in React forms. Here is a basic example of a controlled input for a form which has search and setSearch being passed to the Component as props.
<form className="searchForm" onSubmit={(e) => e.preventDefault()}>
    <label htmlFor="search">Search Posts</label>
    <input
        id="search"
        type="text"
        placeholder="Search Posts"
        value={search}
        onChange={(e) => setSearch(e.target.value)}
    />
</form>
Installing React
Option A: Installing React Automatically
Use the Create React App toolchain to spin up a React application quickly using Node.js, npm, and npx.
- Install Node, npm, and npx if you haven’t already.
- Check Node installation:
node -v - Check npm installation:
npm -v - Check npx installation:
npx -v
- Check Node installation:
- In your terminal, navigate to the directory where you want to create your project root.
- Run the Create React App, replacing “project-name” with your own project:
npx create-react-app project-name. - Your project can now be viewed in your browser:
cd project-namenpm run start
Installation Cleanup
For simple projects, you can delete the following files:
- src/App.test.js
- src/reportWebVitals.js
- src/setupTests.js
- src/logo.svg
Open up the following files to delete unnecessary code blocks:
- src/index.js:
import reportWebVitals from './reportWebVitals';reportWebVitals();
- App.js:
- Delete any any logo code.
Uninstall any unused dependencies from your package.json file:
npm uninstall @testing-library/jest-dom @testing-library/react @testing-library/user-event web-vitals
The Create React App Toolchain
- toolchain: a group of tools and libraries that work together.
- The Create React App toolchain includes Babel and Webpack.
- Node.js (Node): an open-source, multi-platform runtime environment that runs on a server. Allows you to use JavaScript outside of the browser environment.
- npm (Node Package Manager): a collection of open-source packages and package manager.
- npx: an npm package runner that allows you to execute packages without installation.
Important Files & Directories
- package.json: Contains the metadata about the project, a list of dependencies, and scripts you can run using the npm command.
- package-lock.json: An automatically generated file by React that shouldn’t be touched.
- This file records the specific version of dependencies to ensure all devs are working with the same packages.
- node_modules: An automatically created directory that should never be placed under version control.
Option B: Installing React Manually
1. Understand The JavaScript Ecosystem
React requires several things to work properly. Here are the JavaScript tasks that need to be addressed with their respective tools:
- Managing packages - npm
- package: a directory with at least one file called “package.json” that contains metadata about said package.
- Using a module system - ES6
- module: JavaScript code that can be imported/exported for use elsewhere.
- Preprocessing JavaScript - Babel
- Babel: a preprocessor that compiles ES6, applied using Webpack.
- Bundling everything into a single file for the browser - Webpack
- Webpack: a module bundler that ultimately injects a single new file as HTML to be read by the browser.
- Bundling: using the top of the code hierarchy (index.js), specifying the preprocessor (Babel), then producing a single file with the final code (Webpack) for the browser to read.
2. Install Prerequisites
3. Initialize Package Manager (NPM)
In your terminal, create the root directory for your project before initializing NPM.
# Make your project's root directory
mkdir path/to/directory/myProject

# Navigate into your project root
cd path/to/directory/myProject

# Initialize Node Package Manager
npm init

# You should see a prompt for with the name of your project.
# Hit 'Enter/Return' for all prompts.

# "Is this ok?"
yes
4. Install React Packages
There are two types of packages you need to install:
- dependencies: packages imported by our application.
- devDependencies packages required for development and testing.
Install React Dependencies
# Install React
npm install --save react

# Install React-DOM
npm install --save react-dom
Install Dev Dependencies
# Install Babel & Webpack
npm install --save-dev @babel/core @babel/preset-env @babel/preset-react babel-loader webpack webpack-cli webpack-dev-server html-webpack-plugin

# Install URL Loader & File Loader
# For image rendering on a local server
npm install --save-dev url-loader file-loader

# Install CSS/Style Loader
npm install --save-dev style-loader css-loader
5. Add Files To Your Project
Add the following templates into the root of your project:
- index.html
- index.js
- webpack.config.js
- Double check that the
templateandentryfilepaths to your root index.html and index.js are correct! - If your images aren’t loading, you may need to add/remove file-loader rules from the configuration file. See file-loader documentation for examples.
- Double check that the
6. Update Your Scripts
Open your package.json file and update your scripts like so:
"scripts": {
        "start": "webpack-dev-server --mode development --open --hot"
        },
This will enable you to execute the webpack-dev-server and allow for live reloading of changes in your default web browser.
That should be it for installation!
7. Execute Your Scripts
Run npm run start to execute the script which starts React and allows you to view your project in the browser. You should see a message similar to this in your terminal:
Project is running at:
Loopback: http://localhost:8080/
Open a second terminal window for any development needs and allow Node to run in the background in the first window. Press Ctrl+C in the terminal to stop the webpack-dev-server at any time.
Option C: Cloning Existing React Projects
Cloning From GitHub
# Navigate to your project directory
cd project-name

# Navigate to the GitHub repo
# Click the green Code button
# SSH: copy repo location

# Clone the repo in terminal
git clone git@github...

# Rename origin to upstream
git remote rename origin upstream
Renaming the origin allows you to have a connection to the codebase while leaving the origin connection free if you decide to create your own repo later.
React Development Quickstart Guide
After you have installed React, preferably with the Create React App (Installation Option A above), you can start/resume development anytime following these general steps:
Begin Development
Open 3 integrated terminal tabs on your root directory. Keep all 3 running in the background during your development work:
Terminal 1: runs your server environment, e.g. json-server:
npx json-server -p 3500 -w data/db.json-p: port-w: watch for changes (i.e. database)
Terminal 2: executes your React start script, opens your app in the browser, and watches for changes:
npm run start
Terminal 3: general purpose terminal for any development work and Git tracking:
- Check the status before resuming work:
git status. - Make sure you are NOT working on the main branch; checkout a feature or development branch:
git checkout development. - Add and comment changes frequently during development:
git add . && git commit -m "Comment goes here".
End/Pause Development
- Check status:
git status. - Add and commit all changes:
git add . && git commit -m "Comment goes here". - Push all changes to your remote:
git push. - Checkout your main branch:
git checkout main. - Check for a clean working tree status on main before any merges:
git status. - Merge your development branch into the main branch:
git merge development. - Push your update main to remote:
git push. - Kill all processes by executing
Ctrl+Cin each terminal.
Uninstalling React
# List the React installed versions and dependencies
npm list react

# Uninstall React:
npm uninstall react

# Uninstall ReactDOM
npm uninstall react-dom

# Delete the package files
rm package.json package-lock.json
UI Layout
There are several ways you can define layouts for your React App (CSS stylesheets, Bootstrap, React Grid System, etc). Before committing to any framework, determine how your UI can be divided into rows and columns.
Be careful if you choose to use Bootstrap; it contains JavaScript that may conflict with React.
Installing React Grid (Optional)
# Install React Grid
npm install --save react-grid-system
Once installed, add the following to your components:
import { Container, Row, Col } from "react-grid-system";
Naming React Components
- Use PascalCase when naming components.
- Use full words rather than abbreviations.
- One component per folder. For example:
- Component1/
- Example1.js
- Example1.css
- Component2/
- Example2.js
- Example2.css
- Component1/
- Prefix High-Order components with “with”:
const withAuth = (Component)...
Organizing Your Project
The village metaphor is a useful way to conceptualize modules in React as the user interface, made up of hierarchical files and functionality that are imported and exported throughout the app.
Using a village as a framework for structure, here’s one way to organize directories & files:
- myProject
- node_modules
- styles
- index.js (Highest component in hierarchy, App - render to DOM)
- index.html
- package.json
- package-lock.json
- webpack.config.js
- components
- villages: the entire current page/view that can be toggled on or off, i.e. Landing Page
- neighborhoods: sections of the view that are composed of blocks, e.g. Header, Footer, Sidebar, etc.
- blocks: specific functionality of the UI composed of houses, e.g. Navigation, Call To Action, etc.
- houses: the basic building blocks of the UI, sometimes combined into a block (multiple components with a singular purpose) and sometimes stand-alone:
- blocks: specific functionality of the UI composed of houses, e.g. Navigation, Call To Action, etc.
- neighborhoods: sections of the view that are composed of blocks, e.g. Header, Footer, Sidebar, etc.
- villages: the entire current page/view that can be toggled on or off, i.e. Landing Page
Lifecycle Methods
Lifecycle Methods: functions added to a class component and called at specific moments during the life of said component.
There are three phases to a React components, which you can think of as the birth, life, and death of a component:
- Mounting: after the component renders in the view.
- e.g. fetching data
- Updating: when the component updates the UI.
- e.g. saving user input from a form
- Unmounting: when the component’s DOM elements are to be removed from the view.
- e.g. cancel a running timer
For example, to save data between sessions:
// 1. Save state to the browser's storage.
componentDidUpdate() {
   const stateString = JSON.stringify(this.state);
   localStorage.setItem("stateString", stateString);
}

// 2. Fetch data when UI is reopened.
componentDidMount() {
    const stateString = localStorage.getItem("stateString");
    // 3. Set state to the previous session's value.
    if (stateString) {
      const savedState = JSON.parse(stateString);
      this.setState(savedState);
    }
}
Components & Props
Components are defined where exported and used where imported.
Props are defined once, at the highest view (often but not necessarily where the Component is used). But they need to be made available down the entire Component hierarchy; they are passed down every nested file until they are used where the Component is defined.
- Props are defined (or passed) where the component is used.
- Props are passed along the entire Component chain.
- Props are used where the component is defined.
For an example Title component, if your nested directories were: Page/Header/Title, your component/props would look like the following:
// Page.js
import Header from "./Page/Header"

class Page extends React.Component {
    render() {
        // Defines title prop
        return <Header title="Hello, World!"/>;
    }
}

export default Page;

// Page.js/Header.js
import Title from "./Page/Header/Title"

class Header extends React.Component {
    render() {
        // Uses  Title component & passes title prop
        return <Title title={this.props.title}/>;

        /* You could define the prop here if you didn't want to define it in the Header, but this would make your Title less flexible:

        return <Title title="Hello, World!"/>; */
    }
}

export default Header;

// Page.js/Header.js/Title.js
class Title extends React.Component {
    render() {
        // Uses title prop
        return <h1 className="blue">{this.props.title}</h1>;
    }
}

export default Title;
Presentational & Container Components
- Separation of Concerns (SoC): the process of dividing code into specific, singular, and well-defined tasks.
- Presentational Components: components for how the UI looks; render logic.
- Receive data and callbacks via props, then use props to produce JSX. (Tidier option: use
createContexthook instead.)
- Receive data and callbacks via props, then use props to produce JSX. (Tidier option: use
- Container Components : components for data organization and usage; business logic.
- Provide data for updating data models.
- As an alternative to prop drilling, use the
createContexthook to wrap your entire app (or specific parts of it) within a data context that provides values to your components.- This greatly reduces code clutter and the need to manage all the layers of props drilling required for nested components.
Defining Presentational Components
- Break down a UI into its separate components, like this example with Flipboard:
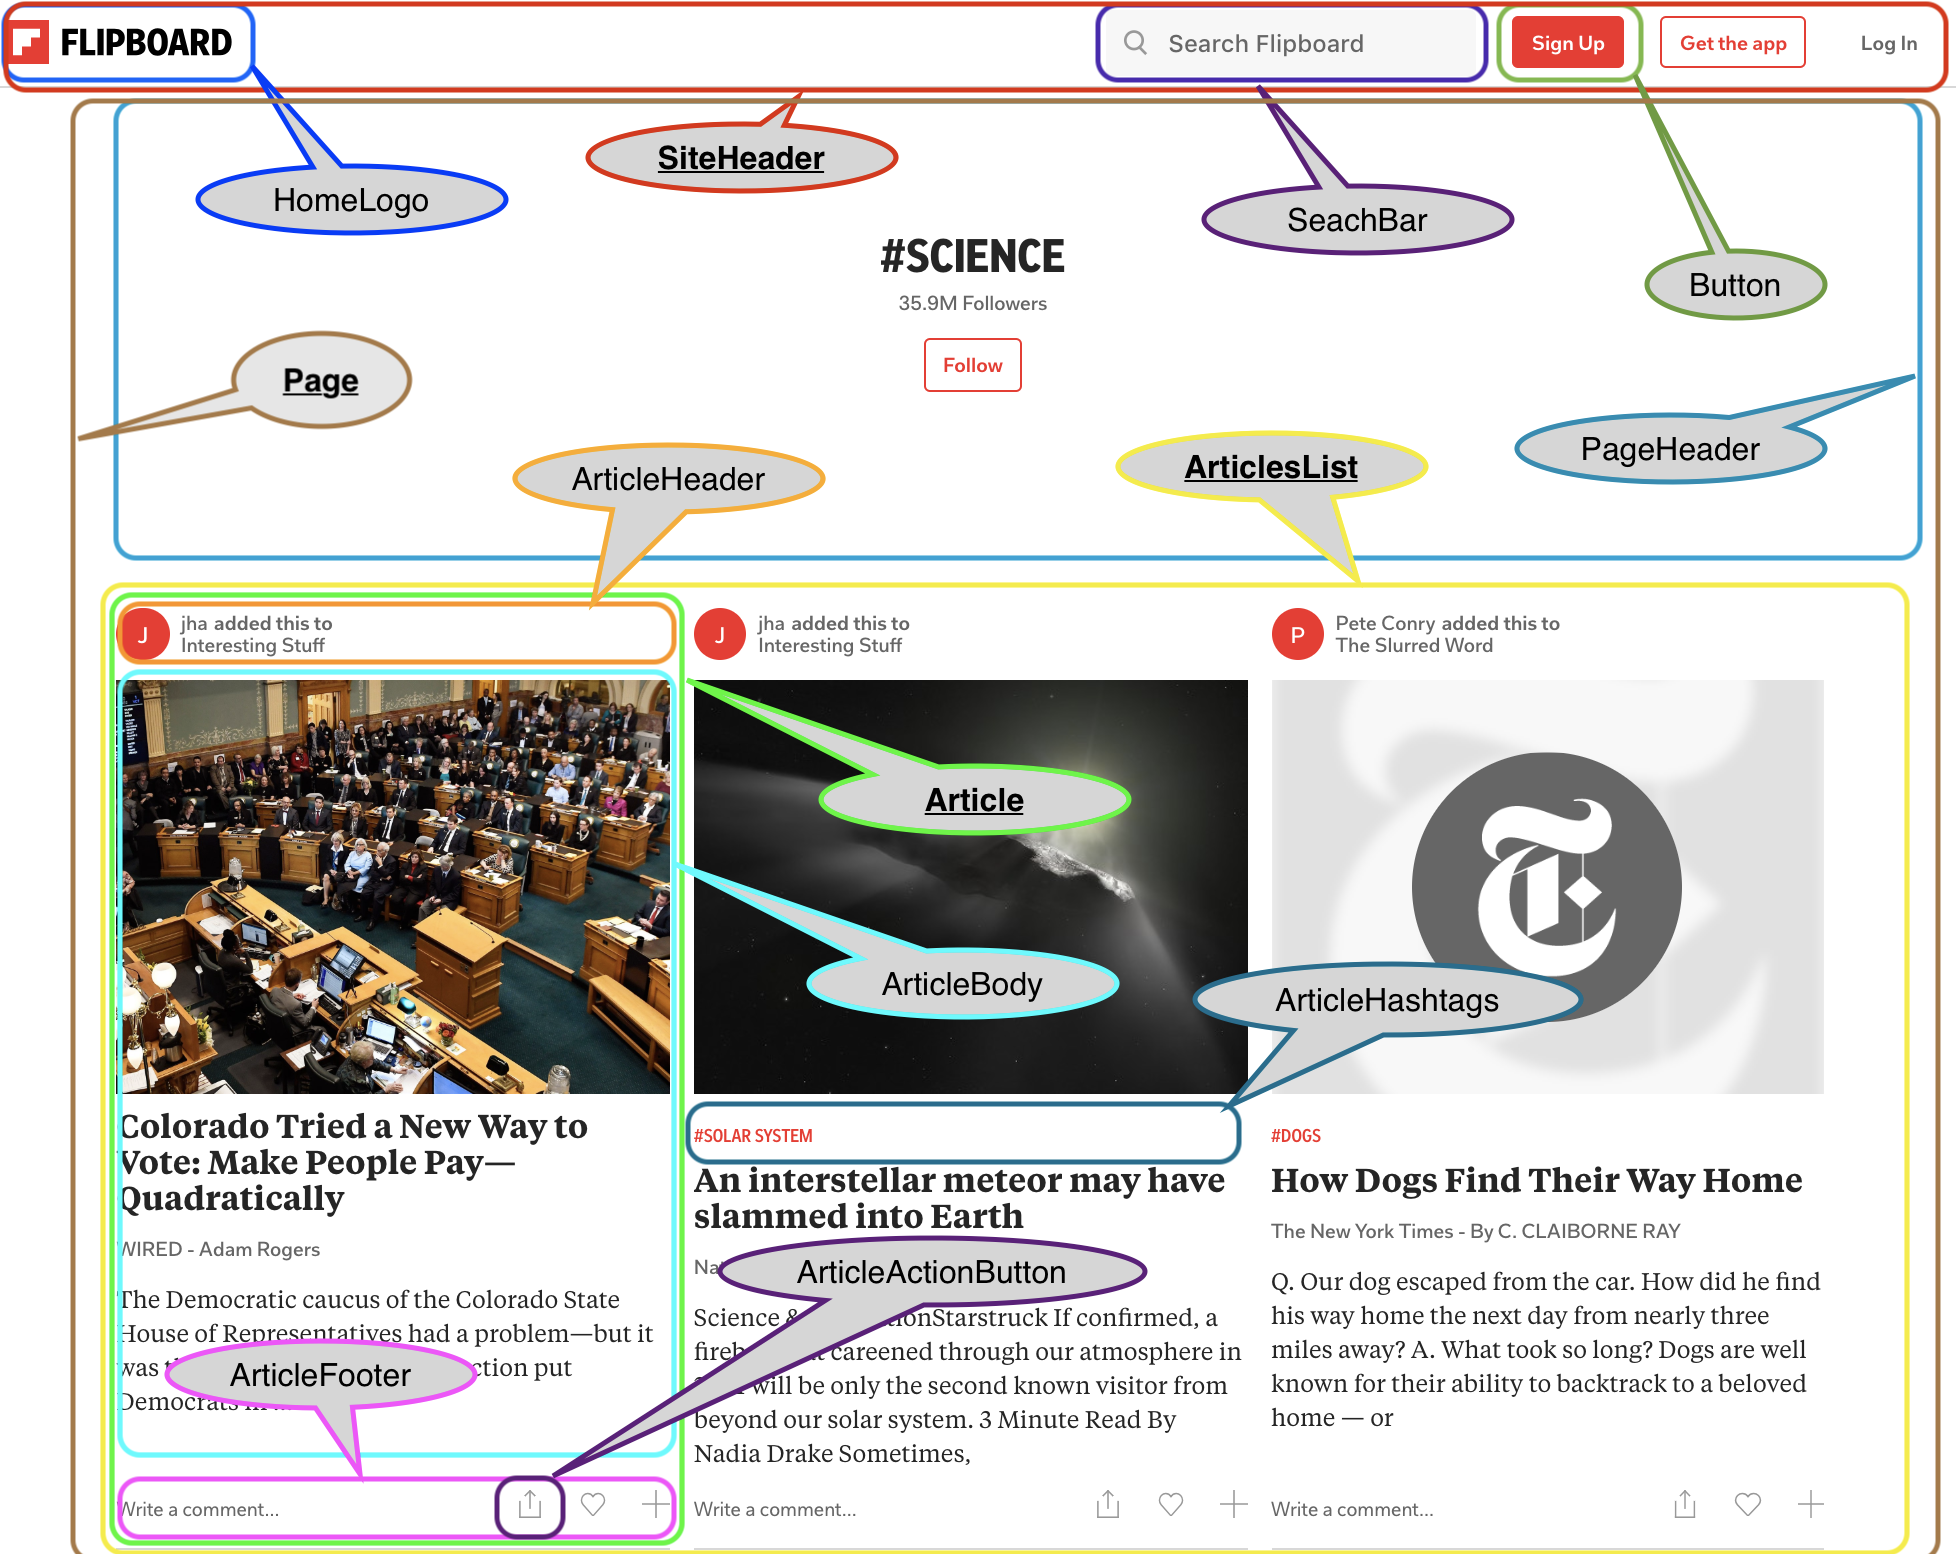 Source: “Skillcrush - Introduction to JavaScript React - Module 11.2”
- Examine the code and make sure each component is responsible for only one part of the UI.
- Separate all component code into individual modules (Presentational Components).
- Import Presentational Components to tie everything together.
- Render Presentational Components with props from the Container Component. For example:
- Page (Container Component) ➡️ Props.ArticlesList ➡️ ArticlesList (Presentational Component)
Starting A Greenfield Project
There are several phases of a greenfield project that you should complete in the following order: dividing the UI into its disparate components, coding a static version of the UI, organizing the data flow, and adding interactivity.
- greenfield project: a brand new project built from scratch.
I. Dividing The UI Into Components
- Wireframe the UI.
- Identify & name the presentational components (appearance rendering).
- Identify & name the container components (data handling).
 Source: “Skillcrush - Introduction to JavaScript React - Module 12.3”
II. Coding A Static UI
- Code a single React component with the JSX required to render the UI.
- Don’t worry about data management or dynamic interactions yet.
- Separate out the JSX into separate components.
- Export these child components and import them into their appropriate parent components.
III. Organizing Data Flow
- data flow: the process by which the UI handles data, including:
- where state is managed.
- how references to data are passed as props down the component tree.
- Determine what will change in the UI.
- What will change with interaction?
- What will change with input?
- Choose a data model (e.g. string, array, object, etc.) appropriate for the dynamic content.
- Assign data management within a container component (e.g. Page or App or some high-level view).
- Swap in variables (state/props) to replace static values.
IV. Adding Interactivity
- Determine user intent.
- What does the user expect to happen when they click a button or submit a form?
- Write event handlers to update data models.
- How does the data need to be updated? For example:
- Adding strings to a list.
- Filtering values from arrays.
- Updating boolean values.
- Determine what type of code best handles the data update (button, text input, lifecycle method, etc).
- How does the data need to be updated? For example:
- Add event listeners to the JSX elements users will interact with.
- Event handlers must be methods of the component that owns the state.
- If the event listeners and state are on different components, pass a reference (prop) to your event handler.
React Hooks
useState vs useEffect
useState: manages state within a functional component; declare a state variable and a function to update said variable.- Stores and updates data.
useEffect: perform side effects in a component after the component has rendered.- e.g. Updates the document title based on a state change, fetches data, or subscribes to events.
useEffect()
// Every rerender
useEffect(() => {
    // Functions inside this hook run AFTER functions outside this hook;
    // i.e. your page components will mount before this inner function is called.
    console.log("Runs every time component rerenders, e.g. onChange");
});

// onMount
useEffect(() => {
    console.log("Runs once)");
}, []);

// Condition based
useEffect(() => {
    console.log("Runs when dependency changes");
}, [dependency]);

// Condition based clean up
useEffect(() => {
    console.log("Runs when dependency changes");
    return () => {
        console.log("Use a return to clean up--this runs before the actual code");
    };
}, [dependency]);
Using Databases and HTTP
JSON Server
Use npx to run JSON Server without installing it as a dependency in your project:
npx json-server -p 3500 -w data/db.json
-p: port-w: watch
Axios
Install Axios as a dependency
npm i axios
Set up Axios in desired file, e.g. src/api/posts.js
import axios from "axios";

export default axios.create({
    baseURL: "http://localhost:3500",
});
In the container component (e.g. App), set up the useEffect logic.
import api from "./api/posts";
function App() {
    useEffect(() => {
        const fetchPosts = async () => {
            try {
                const response = await api.get("/posts");
                setPosts(response.data);
            } catch (err) {
                if (err.response) {
                    // Not in HTTP 200 response range
                    console.log(err.response.data);
                    console.log(err.response.status);
                    console.log(err.response.headers);
                } else {
                    console.log(`Error: ${err.message}`);
                }
            }
        };
        fetchPosts();
    }, []);
}